Quick Access Required Content
Root and Unlock Bootloader with a single click using Android One tool for PC.
Android one Toolkit is a great software for your PC and it has options to root your device as well as unlock your bootloader without any hustle. You can do all these steps in a single click just by following simple instructions.
Note that rooting your device will break the warranty of your phone. It may also brick your device if misused. Proceed with caution. We are not responsible for any kind of damages incurred.
NOTE: This tool is compatible with android firmware version 5.1 or below only.
PREREQUISITES
- Enable USB debugging on your device under developer options found in settings. If you can’t see developer options, open settings and navigate to ‘about phone’, look for build number in ‘about phone’ and tap on it 7 times, it will unlock developer options.
- Enable ‘unknown sources’ on your device security settings.
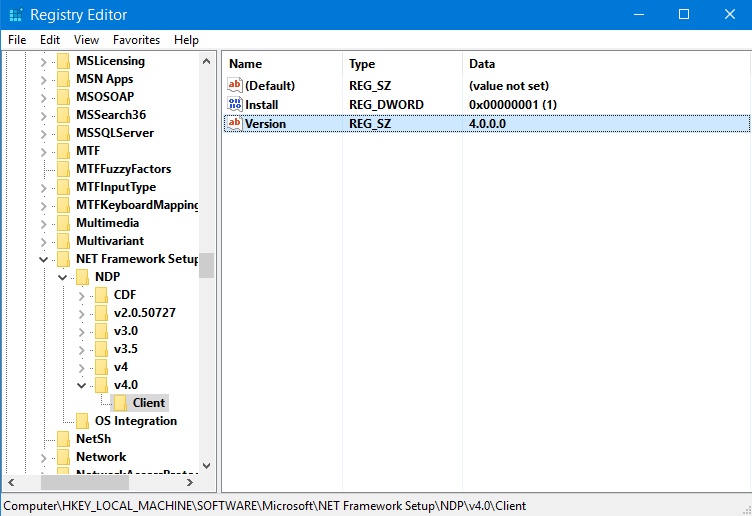
- Your PC must have latest .net framework installed. To check the version of .net framework on your windows, open registry editor with command window. Click on start button and select ‘run’ for windows 7 and below. For windows 8 and 10 presses windows key along with R, it will open run box. Type ‘regedit.exe’ in the open box and press enter. Then navigate to HKEY_LOCAL_MACHINE – SOFTWARE – MICROSOFT – NET FRAMEWORK SETUP – NDP. In the NDP option you can see several versions of .net framework varying from one to four. Make sure you have version 4 or above in it. If you have lower version download latest .net framework from HERE.

- Backup your device to PC. Backup all your data/content to PC.
- You must have latest adb and fastboot drivers on your PC. Download universal adb drivers from HERE. These drivers will work for most of the devices but if they don’t, google search for your device specific adb and fastboot drivers and download them.
 Download Android One Toolkit from HERE. After downloading, install it and download the patch file from HERE, it will update the toolkit to latest version.
TO UNLOCK BOOTLOADER:
NOTE 1: This software will unlock bootloader on few supported devices only.
Check for compatible device list at the end of the post. Do not proceed without knowing your device’s compatibility. It may brick your device.
NOTE 2: Unlocking bootloader will erase or wipe entire user data. Make sure you have a backup of your device on your PC.
- Connect your device to PC and Open Android one Toolkit.
- Now click on ‘List device’ to check your device is listed in it or not. If your device properly connected to adb drivers, it will show in the list.
- then click in ‘unlock’ and wait for few seconds, it will reboot your phone in fastboot mode.
- and press volume up or volume + key to confirm unlocking your bootloader.
- Now the phone will reboot again, this may take little longer because all your data will be formatted. Done, your phone has unlocked bootloader now.
ROOTING DEVICE WITH UNLOCKED BOOTLOADER:
NOTE: If your device has unlocked bootloader or if you have unlocked it by following above steps, you can install a custom recovery before proceeding to root. So note that, to install custom ROM you need to unlock bootloader and install recovery. If you just want to root your device, you can skip this step.
- Connect your device to PC and open toolkit
- Select on any recovery options listed in the software. The most common and popular recovery mods are Clockwork Mod (CWM) or TWRP. You can select either of them.
- Then click on ‘flash recovery’. Wait for some time, your device will reboot and flashing recovery is done.
- Now connect your device again and click on root. Your device will boot into recovery mode and it will give you on screen instructions on how to root. Select ‘install.zip’ and again select the file ‘update.zip’. Done, your device is rooted. Reboot your device to normal mode manually.
ROOTING DEVICE WITH LOCKED BOOTLOADER:
- Connect your device to PC and open the Android One toolkit, click on Root.
- The device will reboot into recovery and follow the on screen instructions to root your device. It will be ‘install.zip’, select this option with volume keys and select ‘update.zip’ file and wait for the process to complete. Manually reboot your device.
Note that you won’t see any Supersu app installed on your device after rooting with this procedure. You have to manually download from Play Store and update SU binary normally. You can check whether your phone is rooted or not by installing Root checker app.
COMMON ERRORS AND FIXES:
Device not showing in list of devices connected
Fix: Install appropriate adb drivers on your PC. Uninstall any old adb drivers and reinstall the latest one.
update.zip is not available on your device after rebooting into recovery mode.
Fix: Try the process again or else manually copy the file to root folder of your sd card which is found in the android one toolkit installed folder on your PC. After copying, reboot into recovery mode and flash the ‘update.zip’ file.
Device stuck boot logo after unlocking bootloader.
Fix: Remove the battery of your phone and reinsert it. Hold power button along with volume + button. You will see ‘fastboot’ option on your device screen. Select it and connect it to PC. Open android one toolkit and click on unlock. On your device press volume + button to confirm unlocking. Now it will be unlocked and wait for device to reboot. It will take a little longer time.
PC freezes after executing ‘unlock’ or ‘root’ option in Android one Toolkit.
Fix: This means you have either old fastboot drivers or no drivers at all .Install or update latest adb and fastboot drivers on your PC.
COMPATIBLE DEVICES:
- Cherry mobile One
- Evercross One X
- Karbonn Sparkle V
- Micromax Canvas A1
- Mito Impact
- MyPhone Uno
- Nexian Journey One
- Spice Dream Uno
- Symphony Roar A50
Share your thoughts and questions in comments below.